


If you’ve been looking to leverage your AI assistant capabilities in TypingMind with automation, setting up the Make MCP server on TypingMind is exactly what you need. With it, you can connect TypingMind to Make.com scenarios and unlock integrations with thousands of apps and automating workflows directly from your chat.
In this post, we’ll explore:
- What the Make MCP server is and why it matters
- A detailed step-by-step installation guide
- Practical real-world examples of how to use it
- Pro tips for managing your automations securely
What is TypingMind?
TypingMind.com is the best chat UI that help you harness the full potential of ChatGPT and other AI models so you can get the well-shaped AI responses that specifically tailor for your needs.
It offers advanced features such as multiple AI models conversation, chat management (Projects, Folders), plugin integrations, multiple AI agents, and fine-tuned controls for connecting external data and services. TypingMind allows deeper customization, including connecting to MCP servers.

What is Make.com MCP?
The Make MCP server is an implementation of this protocol that bridges TypingMind and Make.com. Once configured, your AI assistant on TypingMind can:
- Run existing Make scenarios directly from chat.
- Trigger actions across thousands of applications, including Slack, Gmail, Notion, Google Sheets, CRMs, project management tools, and many more.
- Automate multi-step workflows without the need to leave TypingMind or manually operate separate applications.
This TypingMind + Make MCP integration turns TypingMind into a command center where conversational queries are translated into real actions executed through Make.
How to Set Up Make.com MCP with TypingMind
Setting up the Make MCP in TypingMind takes just a few minutes. Here’s the step-by-step guide:
Step 1: Set up MCP Connectors
In TypingMind, go to Settings → Advanced Settings → Model Context Protocol to start setup your MCP connector. The MCP Connector acts as the bridge between TypingMind and the MCP servers.
MCP servers require a server to run on. TypingMind allows you to connect to the MCP servers via:
- Your own local device
- Or a private remote server.
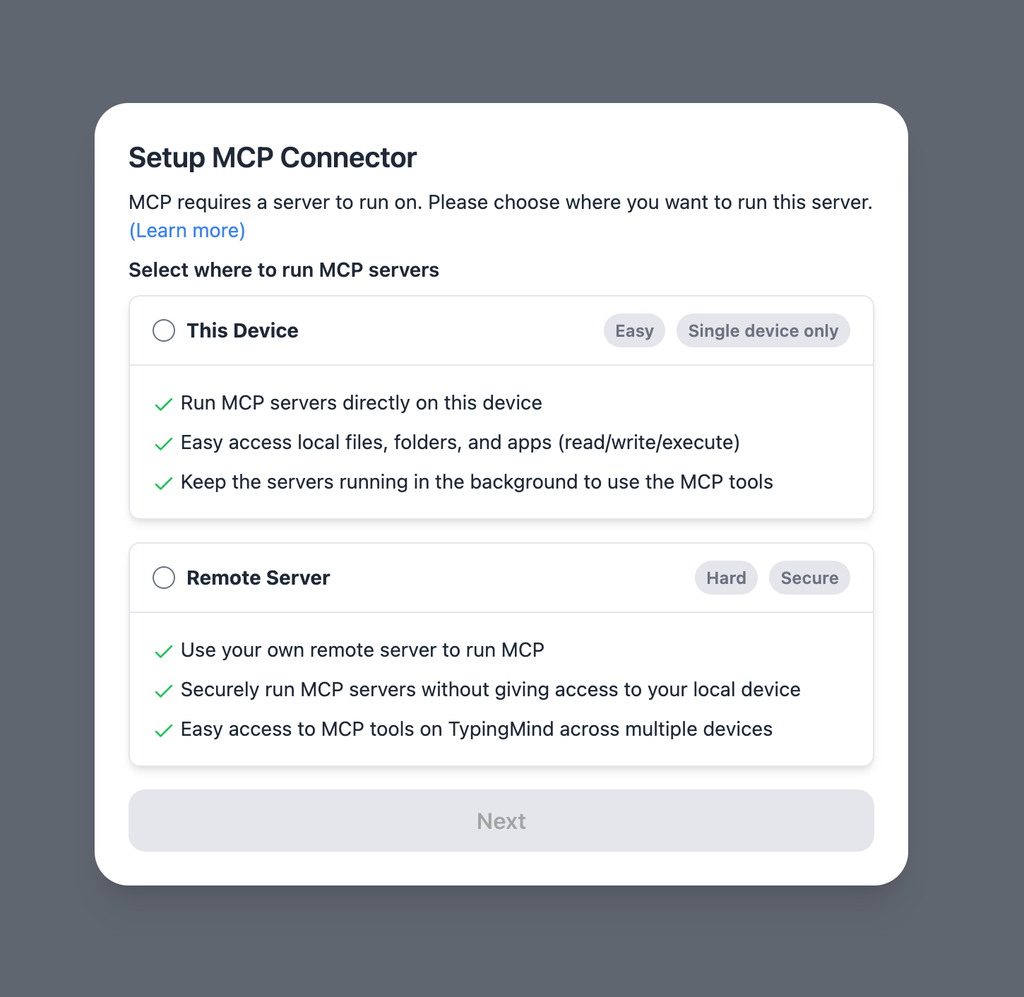
If you choose to run the MCP servers on your device, run the command displayed on the screen.
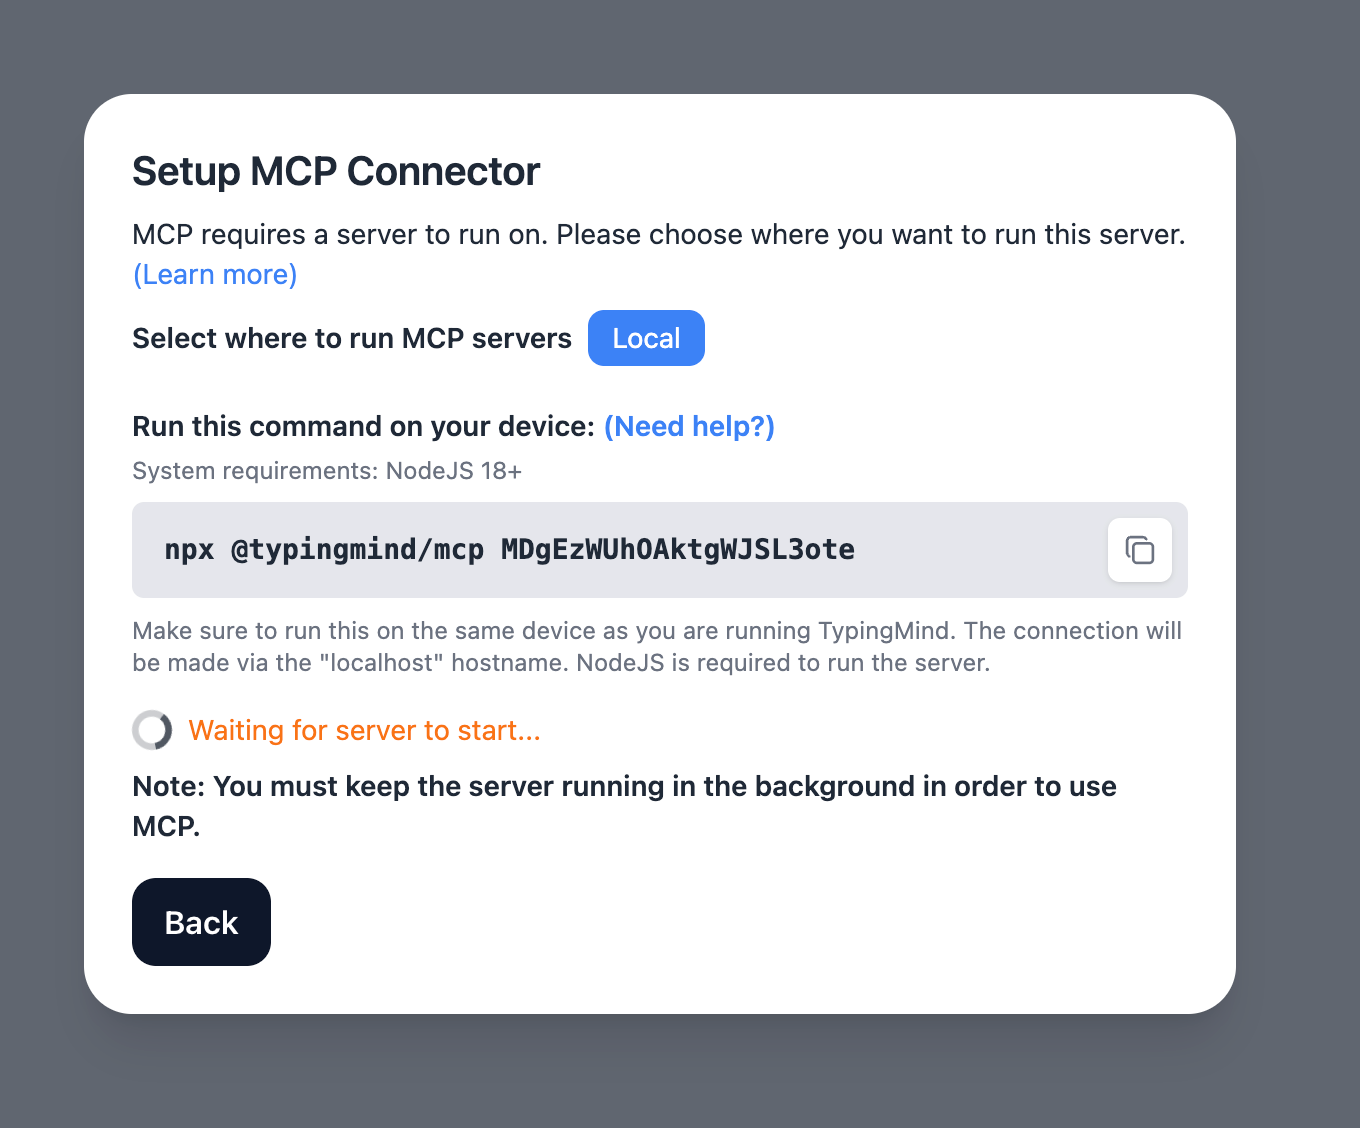
Detail setup can be found at https://docs.typingmind.com/model-context-protocol-in-typingmind
Step 2: Obtain Make MCP Token
An MCP token is a unique URL that allows external AI systems to access your tools in Make.
To obtain an MCP token:
- In the left sidebar of your Make account, click your name.
- Click Profile.
- Navigate to the API / MCP access tab.
- Click Add token.
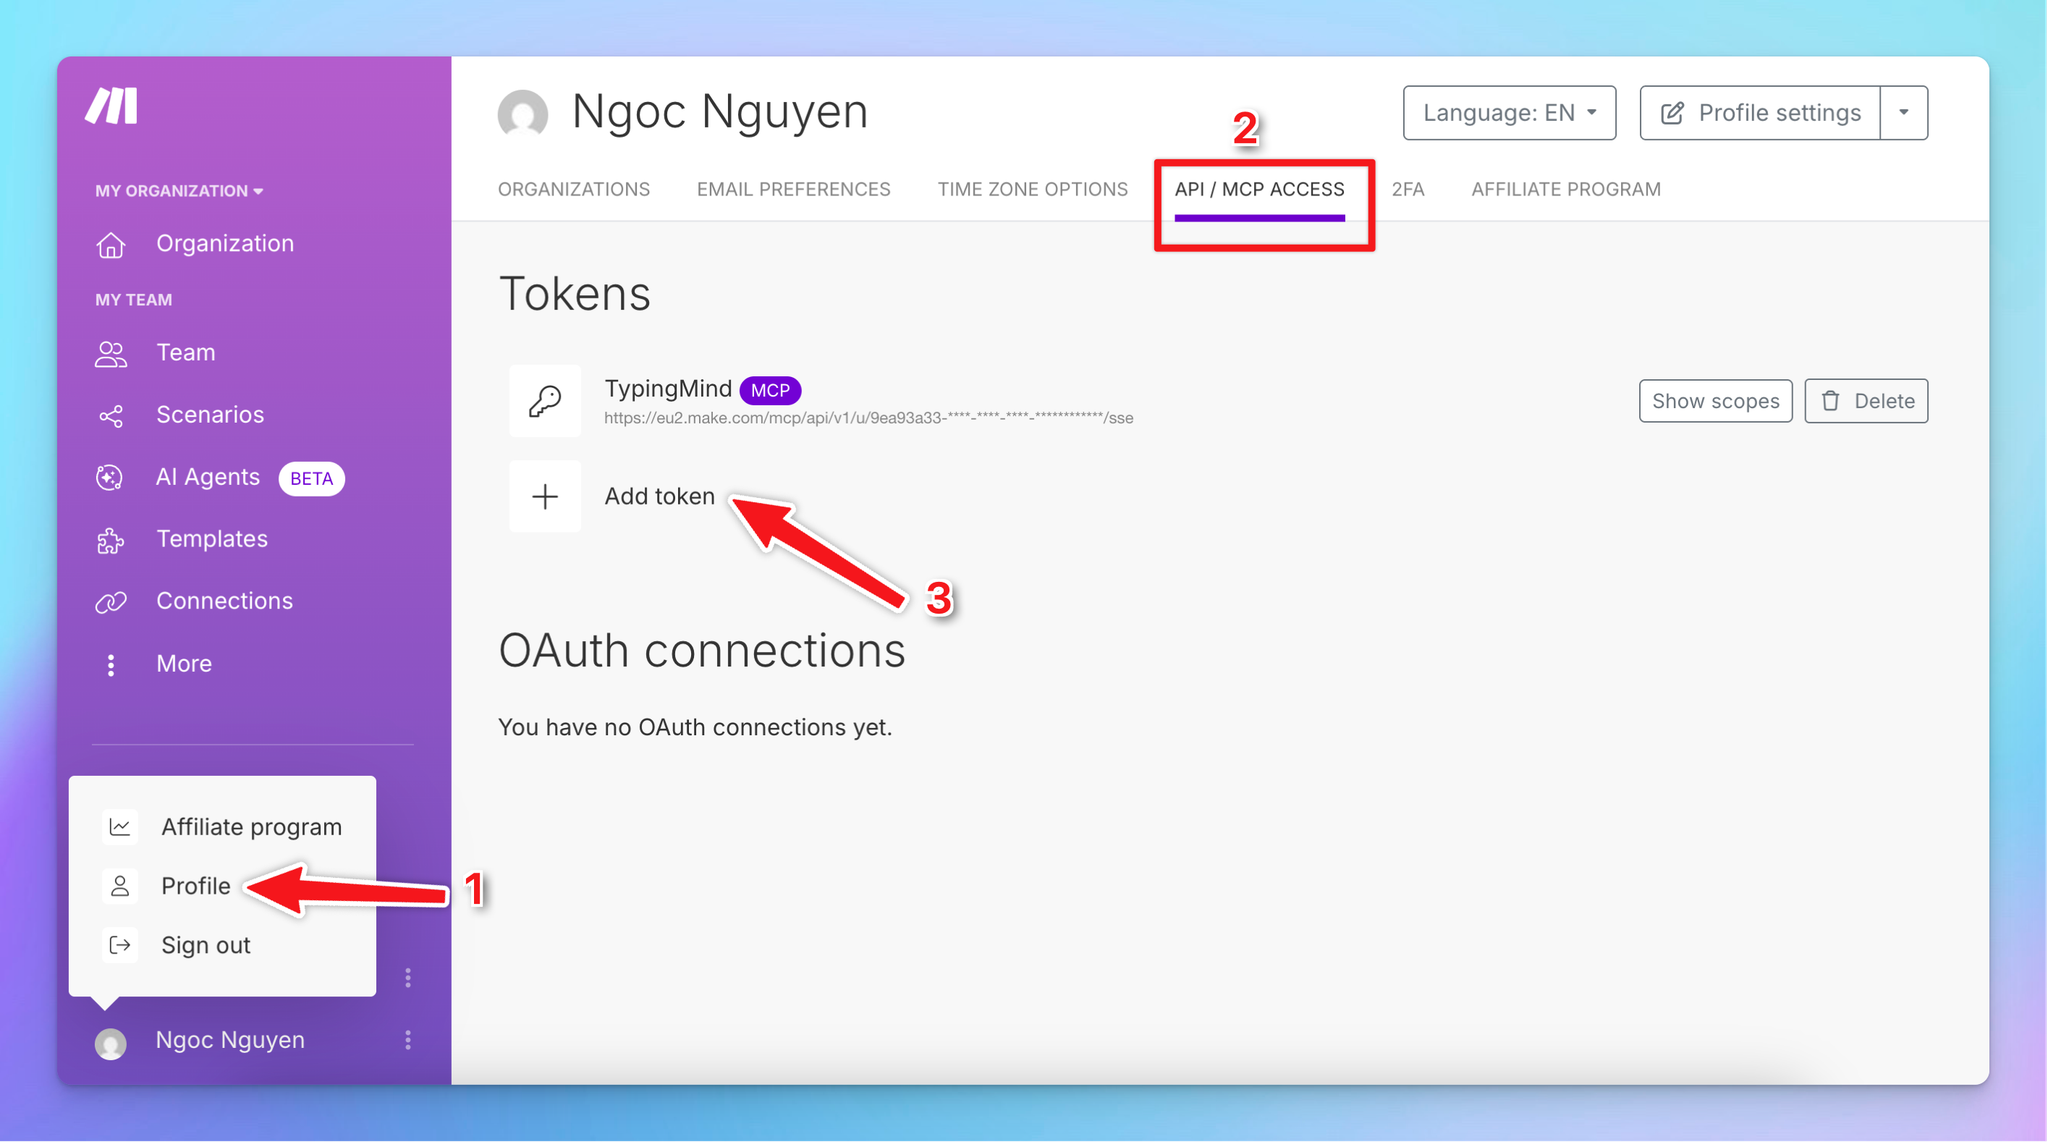
- In Type, select MCP Token.
- In Label, name your MCP token.
- Click Add.
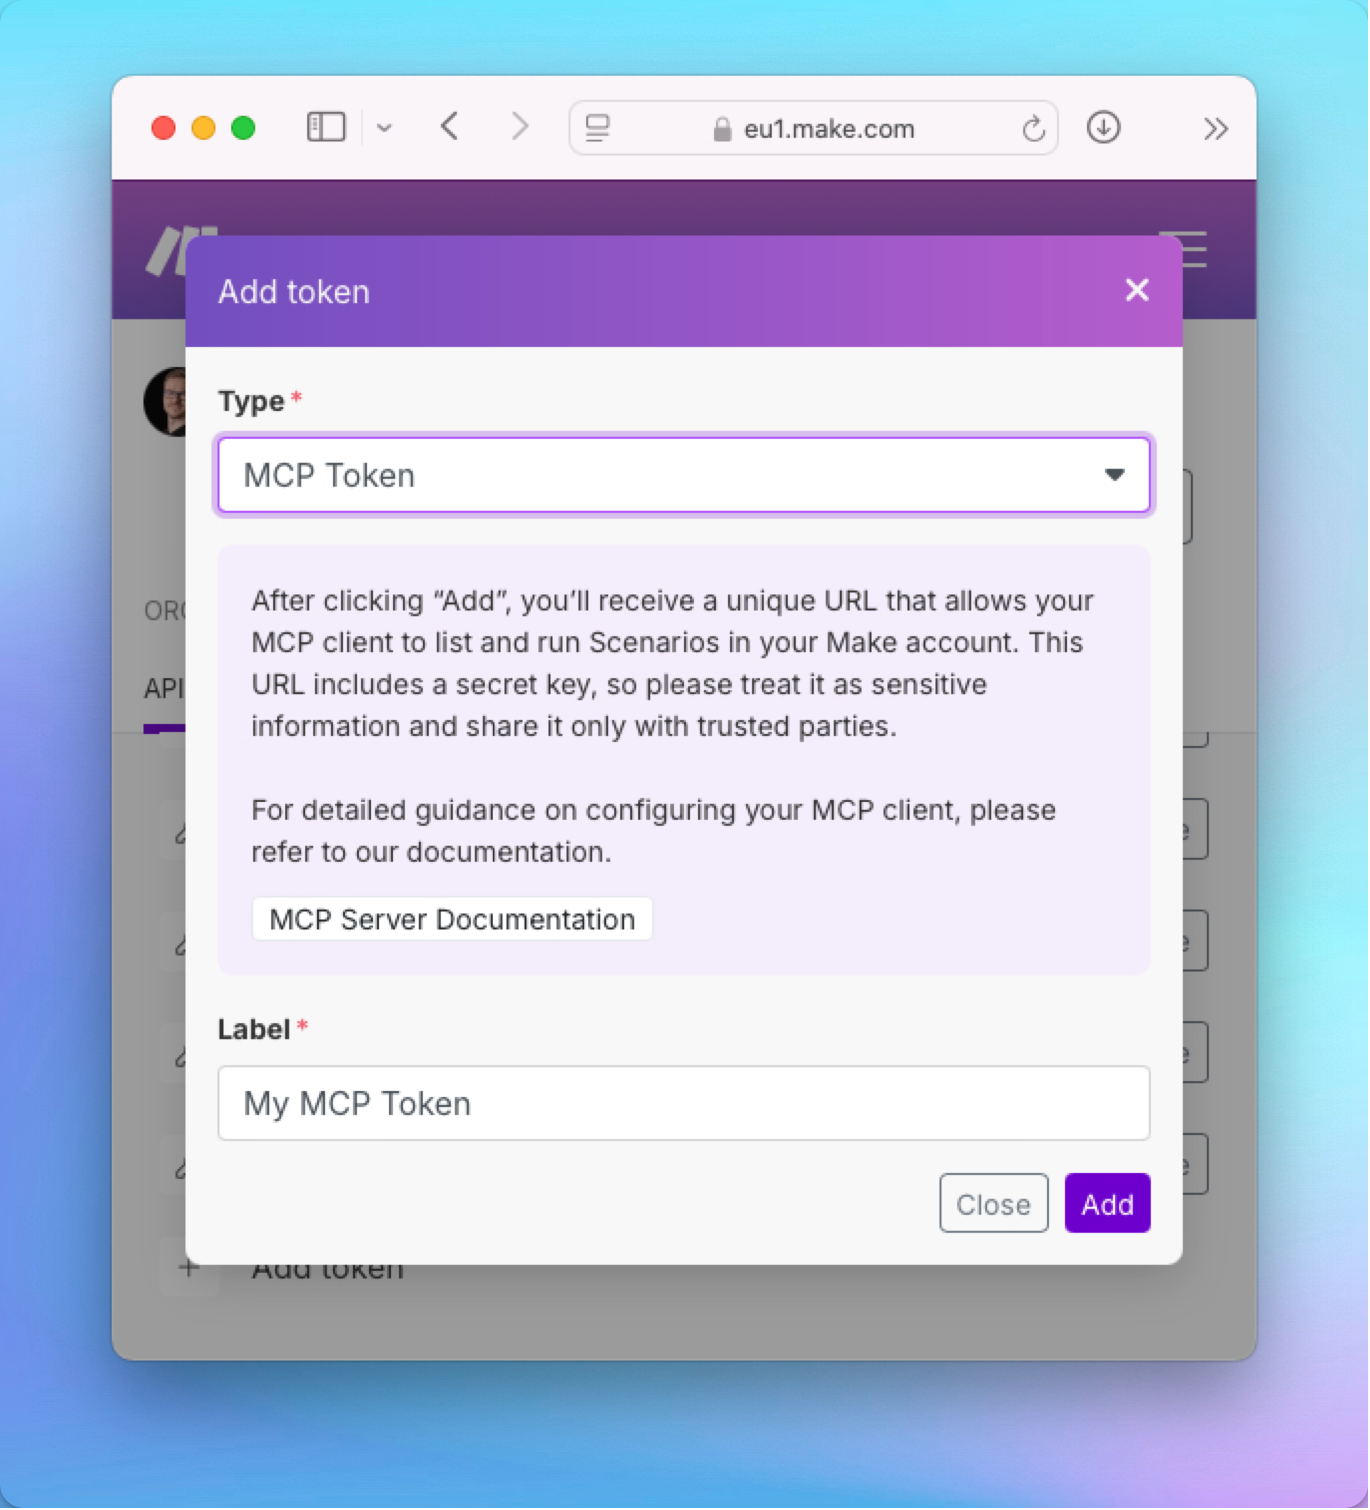
- Copy the token to a safe place to use later on TypingMind, example token format:
https://eu2.make.com/mcp/api/v1/u/8*******/sse
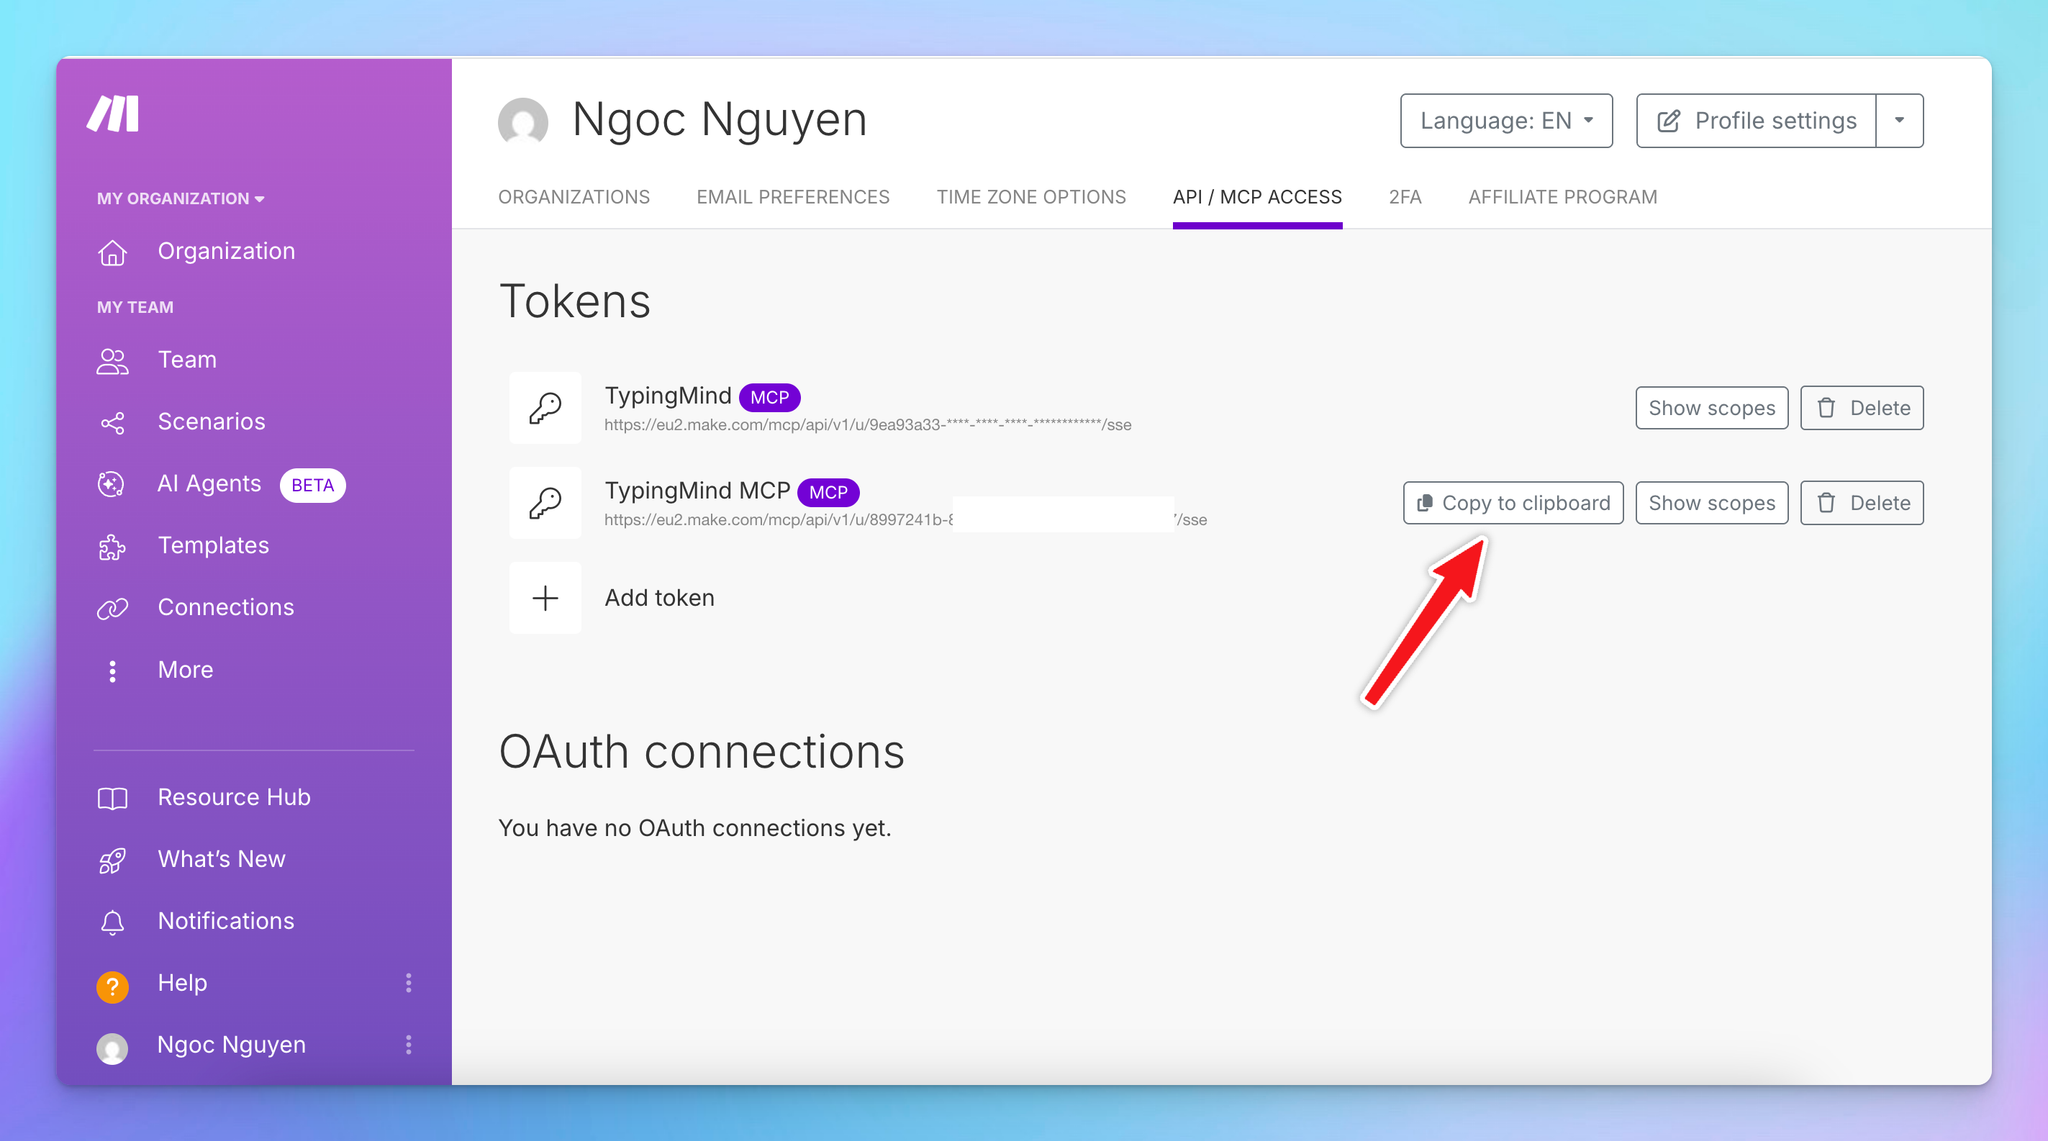
⚠️ Treat this URL like a password. It gives TypingMind access to your configured scenarios.
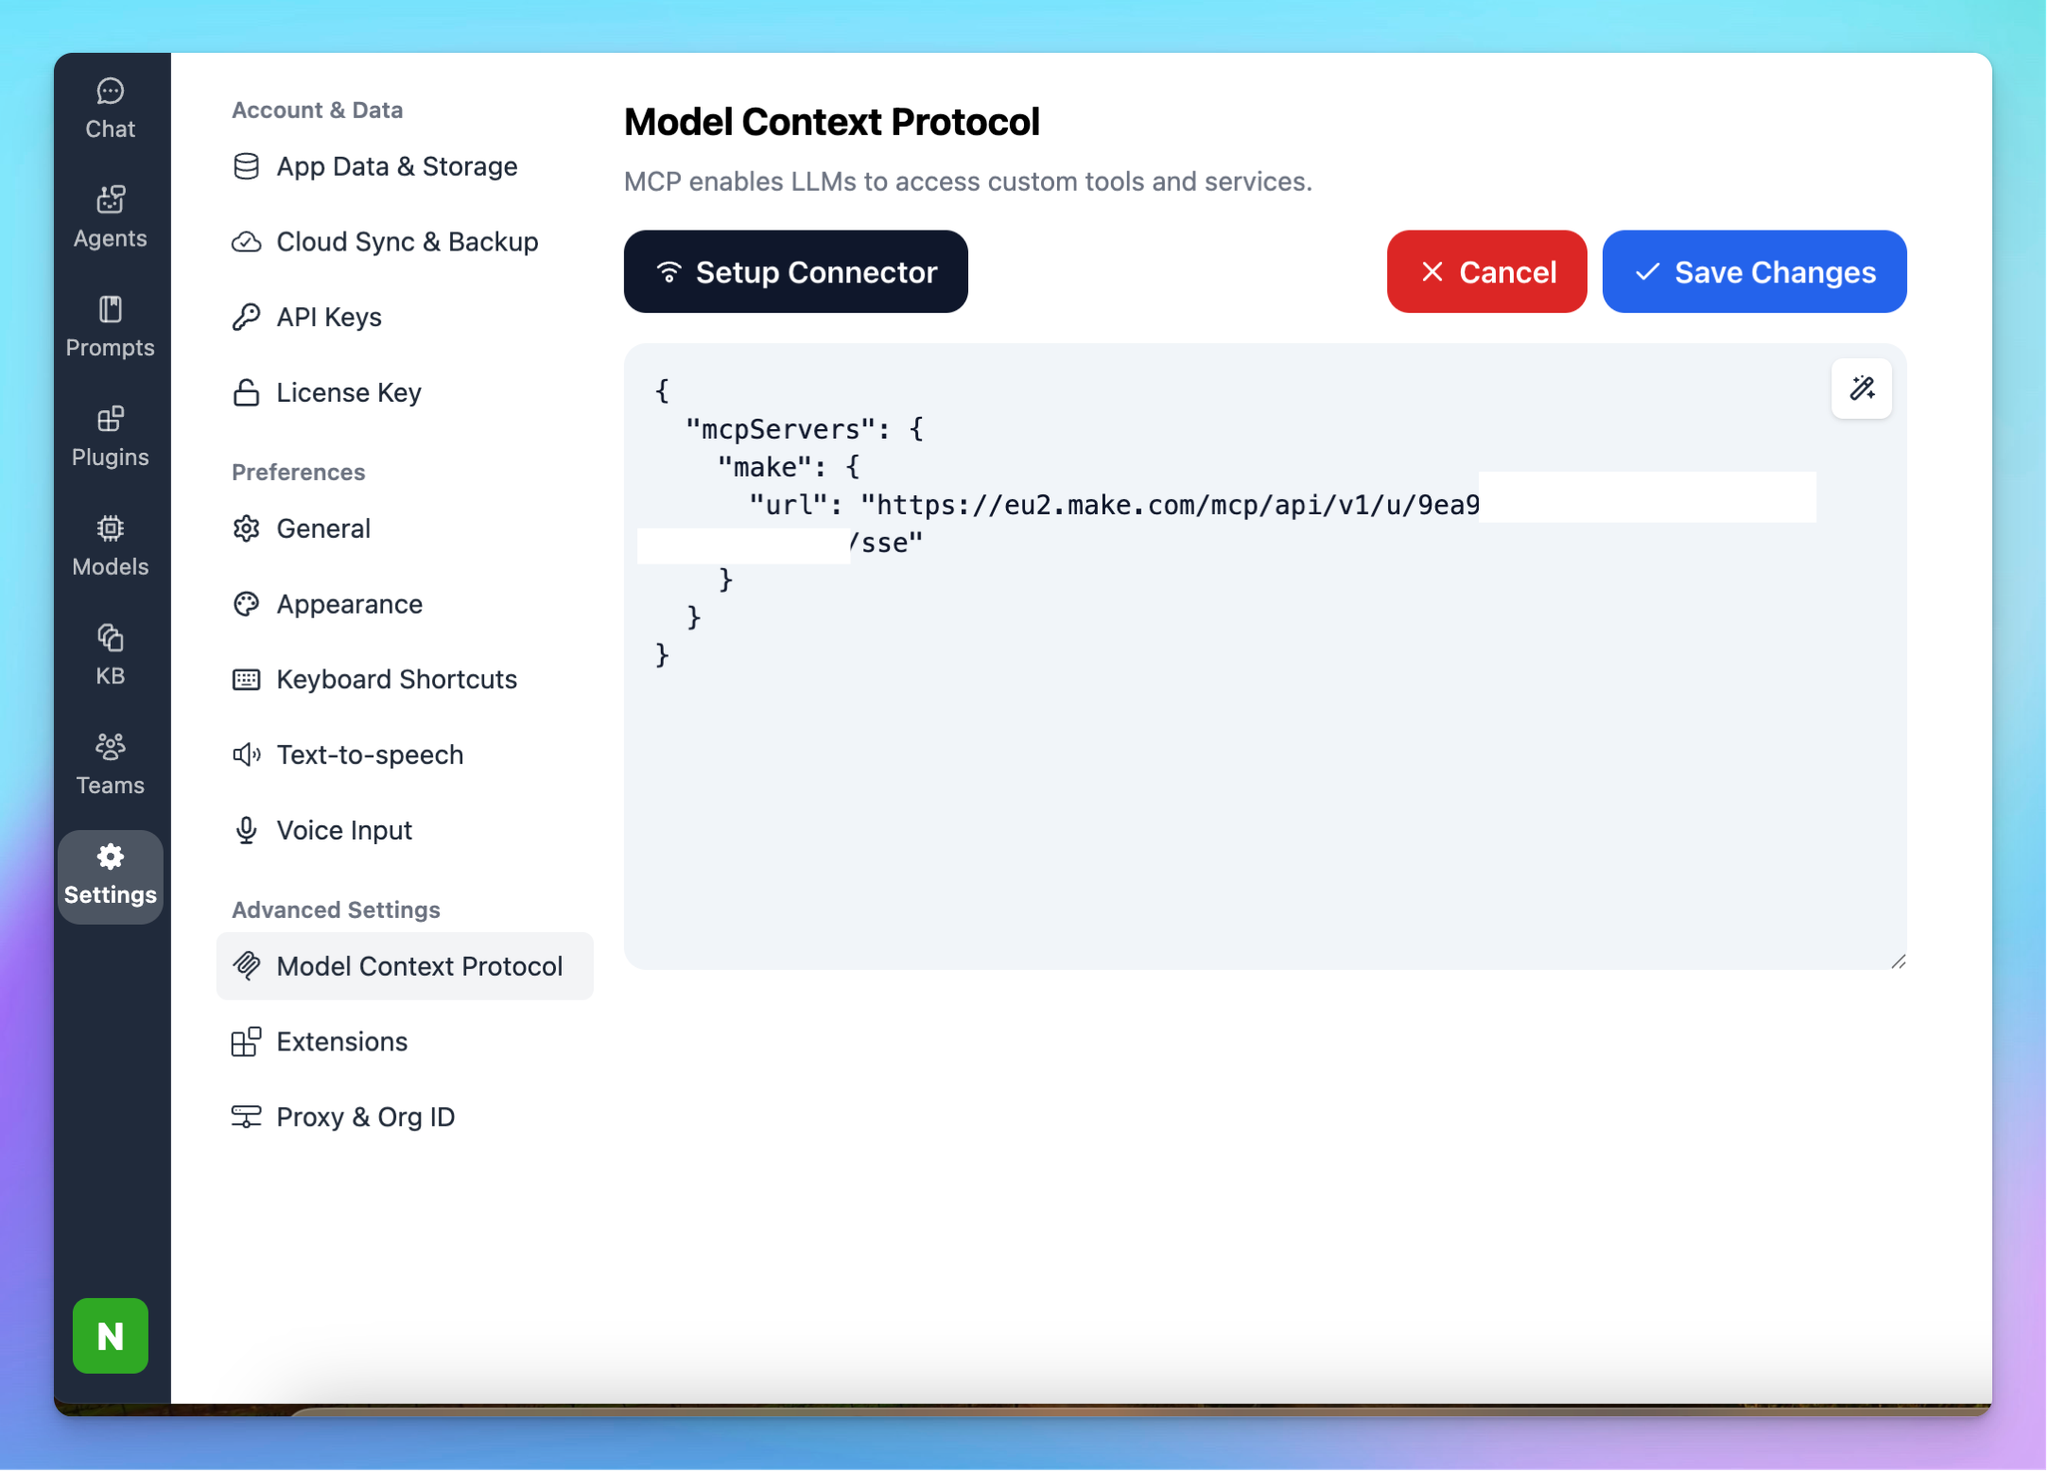
Step 3: Add the Make MCP Server to TypingMind
- Click on Edit Servers to add MCP server
- Add the following JSON to configure the Make MCP server:
"mcpServers": {
    "make": {
      "url": "https://<MAKE_ZONE>/mcp/api/v1/u/<MCP_TOKEN>/sse"
    }
  }
}
With the URL is your copied Make MCP token in step 2.
Step 3: Enable make via Plugin section
After the MCP servers are added successfully, it will show up in your Plugins page to be used like plugin. You can use the MCP tools directly or assign them to AI agent like other plugins.
- Go to the Plugins section in TypingMind.
- You should see a new plugin called “make”.
- Enable the plugin
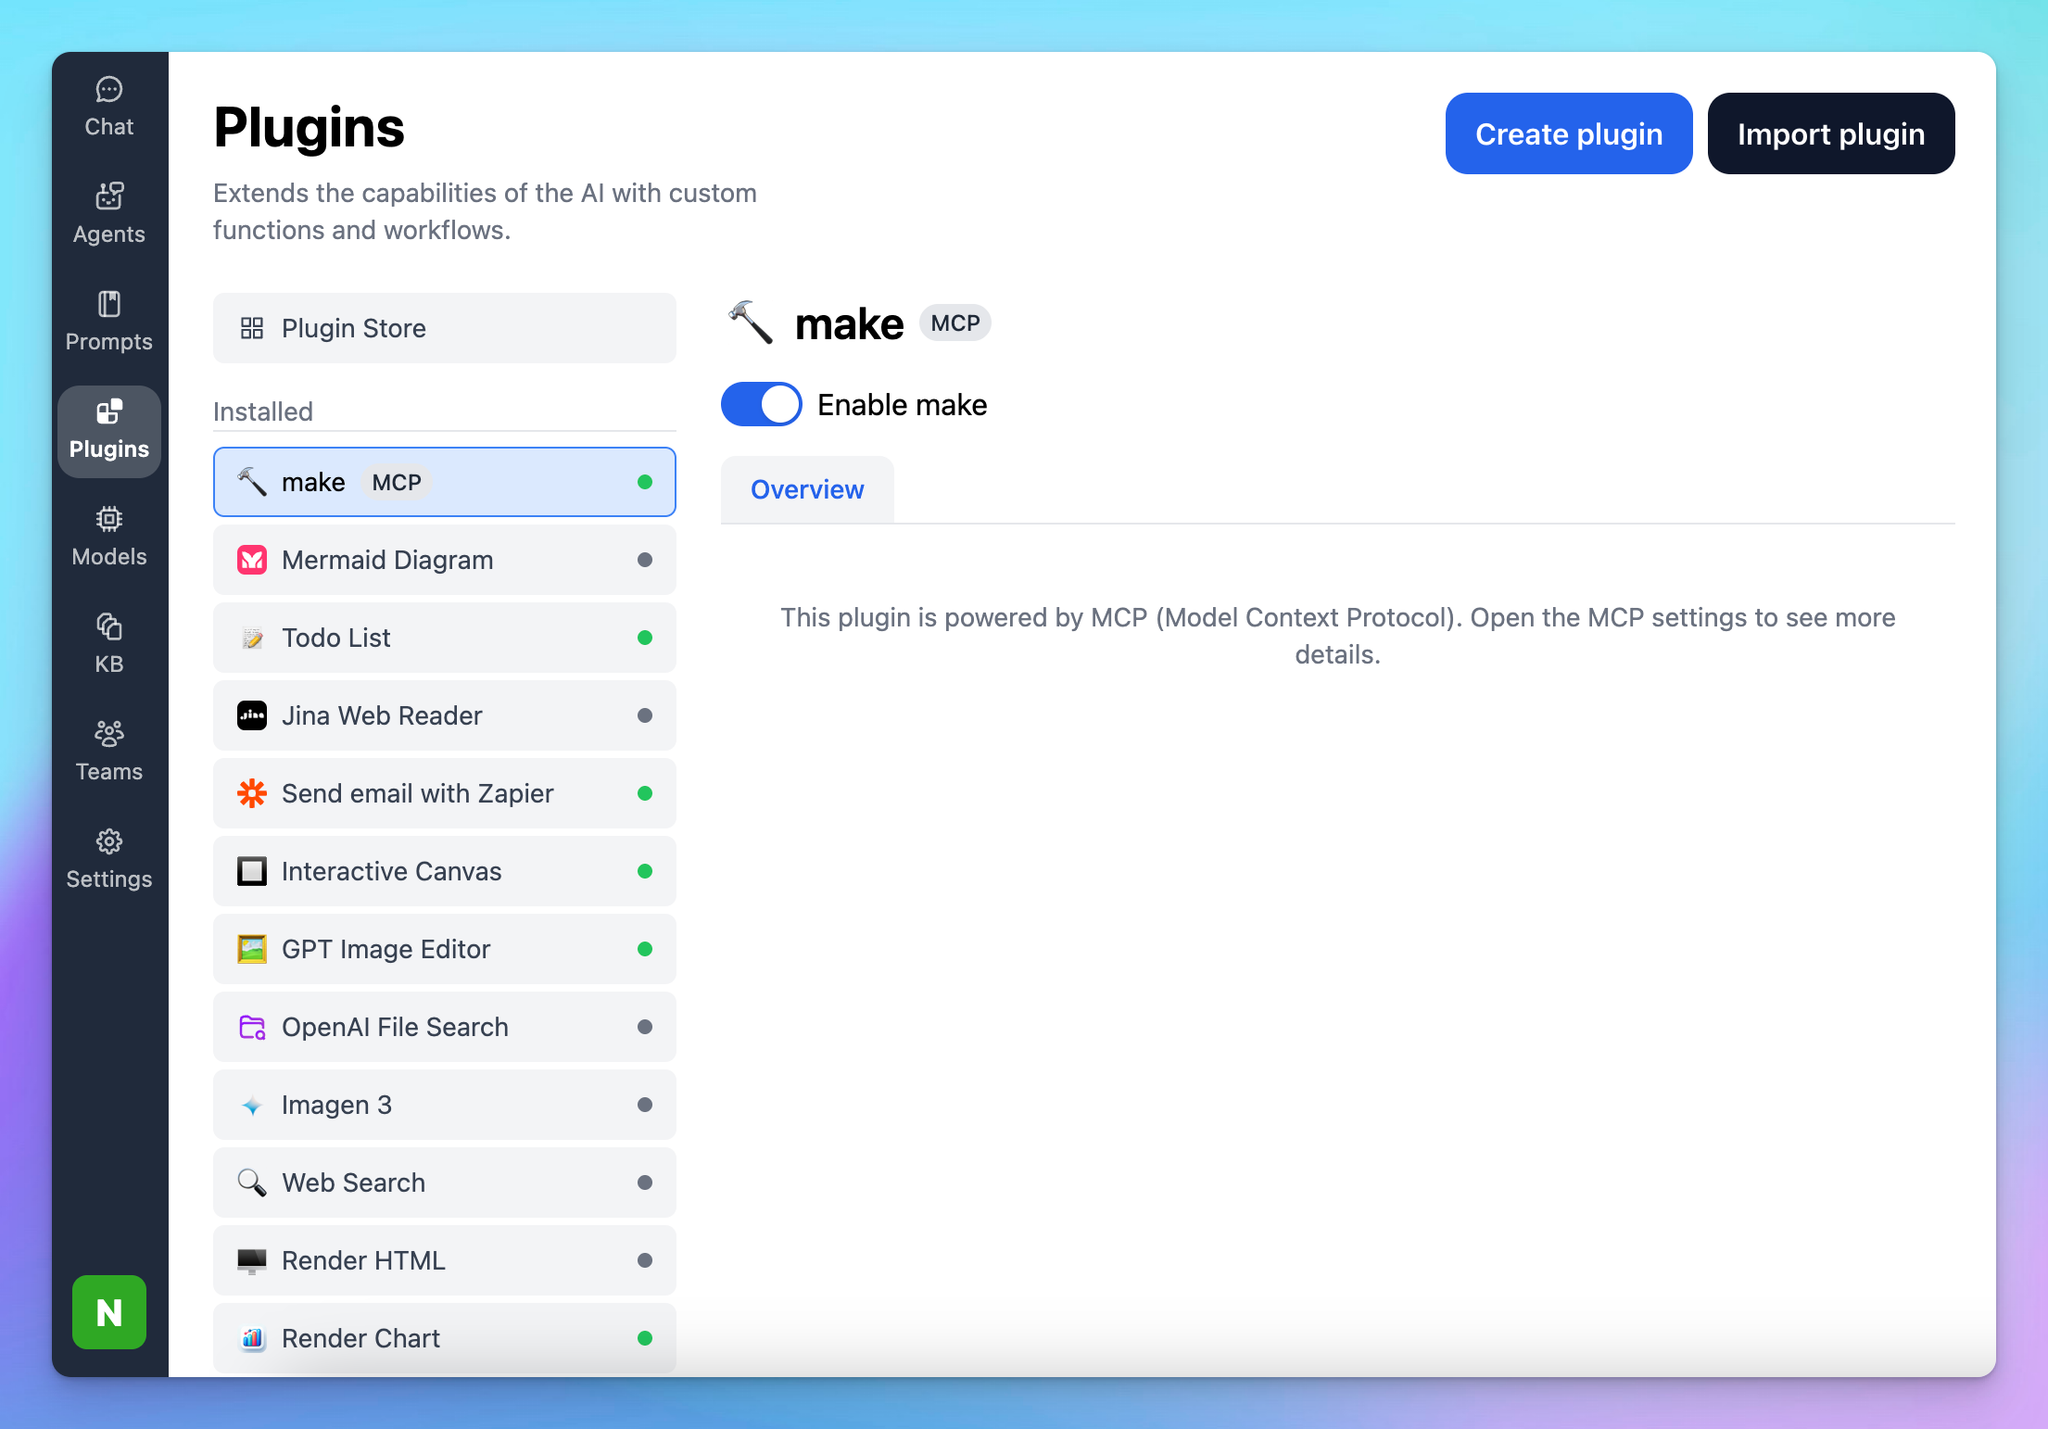
This allows you to run current scenarios available on Make directly on TypingMind easily.
Top 5 Practical Examples in running Make automation on TypingMind

Once configured, the Make MCP integration allows TypingMind to not only provide information but also to execute workflows directly. Here are several practical scenarios that you can refer to:
1. Email Follow-Up Automation
Connect: Link your Help Desk platform (e.g., Zendesk, Intercom) to TypingMind via the Make MCP server.
Flow:
- In TypingMind, prompt:
“Check all tickets that mention a request for a custom pricing plan.” - TypingMind reviews and lists all relevant tickets.
- You instruct:
“Draft professional follow-up responses for each ticket.” - TypingMind prepares tailored replies.
- Make sends the responses back through Zendesk or Intercom and logs them into your CRM.
Result: Customer tickets are filtered, answered, and tracked without manual effort.
2. Meeting Notes to Task Management
Connect: Integrate your transcription tool (e.g., Otter.ai, Fireflies, Google Meet transcripts) and your project management system (e.g., Asana, Trello).
Flow:
- Paste a meeting transcript into TypingMind.
- Ask:
“Extract all action items with owners and deadlines.” - TypingMind produces a clean, structured task list.
- Make creates corresponding tasks in your project management tool, assigning the correct team members automatically.
Result: Every meeting produces actionable tasks that are immediately added to your team’s workflow.
3. Content Publishing Workflow
Connect: Integrate your content management system (WordPress, Notion) and team communication tool (Slack).
Flow:
- Provide an outline in TypingMind.
- Ask:
“Expand this into a full blog draft optimized for SEO.” - TypingMind generates a complete article.
- Make creates a new draft in WordPress or Notion and notifies your content team in Slack.
Result: Content flows directly from idea to review stage without copy-pasting or uploading drafts manually.
4. Daily Briefing to Task Planning
Connect: Integrate your email, calendar, and task manager (Google Calendar, Todoist).
Flow:
- In TypingMind, request:
“Review my unread emails and highlight urgent items.” - TypingMind analyzes the inbox and produces a prioritized summary.
- Ask:
“Turn these into a daily action plan.” - Make creates calendar events, schedules tasks in Todoist, and sends a summary briefing to Slack.
Result: You begin each day with a clear agenda, automatically structured and scheduled.
Best Practices for Effective Use
- Combine Plugins Thoughtfully
TypingMind allows you to use multiple plugins together. This means you could combine a web search plugin, summarization, and a Make automation in one seamless chain of actions. - Document Your Workflows
Keep a record of the scenarios you integrate with TypingMind to ensure you and your team understand what actions are being automated.
Boost Your Productivity with TypingMind + Make MCP
Make MCP transforms TypingMind from a conversational assistant into a true automation command center. Instead of jumping between dashboards or writing code, you can simply describe what you want in plain language, and TypingMind coordinates the rest through Make.
Use it to:
- Publish content instantly across your platforms.
- Route approvals and updates through the right tools.
- Keep your CRM, files, and tasks synchronized.
- Run multi-step workflows without lifting a finger.
With TypingMind as your interface and Make as the engine, almost any workflow can be automated from a single chat.
Final Thoughts
Integrating the Make MCP server into TypingMind is more than a technical upgrade – it is a shift in how you work.
Instead of moving between dashboards or writing manual updates, you can run entire business processes from a single conversation. TypingMind interprets your intent, Make carries out the execution, and together they create a seamless flow from idea to action.
This combination reduces friction, shortens response times, and allows both individuals and teams to focus on higher-value work.
Try now on TypingMind!


